
Hi everyone. Today I am going to tell
you about a product that has revolutionized the craft industry. In fact this
product has become almost a necessity with every crafter. You would have worked
with different sorts of glues, varnishes or other gluing agents, but I am sure,
once you use MOD PODGE, you gonna throw everything out of the window. So go through
the below presentation carefully and change your world forever…
What is Mod Podge?
Mod Podge can be safely termed as one
of the most versatile and ensuring product of the craft industry. It is a glue
which is known to have magical powers. It can be used as a glue/sealant/varnish
all wrapped into one. It holds almost anything together, adheres any paper or
photo to any surface and manages to do it flawlessly. It not only attaches but
can also be used on top of your attached piece to seal the attachment and also
add shine and glitter to your creation.


Mod Podge was developed way back in
the year 1960 by a designer – Jan Wetstone. Been a ardent lover of craft and
decoupage, Jan used to be frustrated with the lack of efficiency that comes
with glues available for making collages or decoupaging. It involved lots of
planning, coats of varnish and sanding in between each coat in order to make
sure that another coat could be placed on top. So Jan started experimenting in
her garage and soon came up with a perfect concoction that dries quickly and
gives a good finish and flawless composition. This new mixture came to be known
as “Modern Decoupaging” or MOD PODGE. Soon this new wonder product became a
rage with crafters.
Why
is Mod Podge so famous?
Mod Podge can bind any two surfaces –
that too quickly and perfectly. It is water based and hence easy clean-up. It
is non-toxic and hence perfect for young crafters. In addition to the original
matte and gloss formulas, it includes an assortment of specialty finishes for
visual effects. It can even be coloured and used like paint, or have glitter
added to it, or add small beads etc. You can build up layers of texture with it
as well. Hence it has been used by crafters across the world as one of their
basic product while crafting. It has also been used for upcycling/reviving
everyday items around the home; personalizing gifts etc. Mod Podge can be used
almost on any surface such as wood, terra cotta, metal, tin, glass, paper mache
and fabric.
Imagining Craft world without Mod
Podge is now impossible.

Types
of Mod Podge available.
Classic
Mod Podge – Available in Gloss and Matt Finish. This is
the original Mod Podge formula – that have been around since the 1960s, so it
has been well and truly tested. Classic Mod Podge can b used for :
sealing wood, chipboard or terracotta
prior to painting to give a smooth surface to work on.
ii. pasting napkins to any surface. It not
only attaches the napkin, but also seals the surface.
iii. gluing pattern papers or paper motifs
or little embellishments to books, scrapbooks or boxes
iv. final top cover on just about anything
for added protection
Paper
Mod Podge – Again available in Gloss and Matt finish.
This can be used in exactly the same way as Classic Mod Podge. However Paper
Mod Podge is non-tacky, so it is better while using on two paper surfaces –
specially for scrapbooking. It also has anti fungal and archival properties. So
in case used as top layer on photos or paper, these last long and don’t yellow
with time.
Satin
Mod Podge - This
is the same as the two classic formulas, but the finish is satin. It gives a
lustrous, soft appearance somewhere between a matte and gloss.
Hard Coat Mod Podge – Specially designed for larger pieces including furniture and projects that are frequently used and handled. It has a satin finish which disguises scratches and its ultimate durable finish provides extra protection. If you are thinking of covering an old chair or old strolley bag with fabric, papers etc., then this formula is for you.
Hard Coat Mod Podge – Specially designed for larger pieces including furniture and projects that are frequently used and handled. It has a satin finish which disguises scratches and its ultimate durable finish provides extra protection. If you are thinking of covering an old chair or old strolley bag with fabric, papers etc., then this formula is for you.
Outdoor
Mod Podge – Great for terracotta pots and wood
projects, gardn sticks, sign plagues etc. This Mod Podge comes with built-in
protection from moisture, sunlight and elements. Use this to stick paper on any
outdoor surface and it will stay like for a good 3-4 years.
Fabric
Mod Podge – Apt for gluing fabric to any surface
Sparkle
Mod Podge – This is a gloss Mod Podge with an added
bling. It contains fine glitter pieces that will add glitz to any project. You
can also use this Mod Podge on top of your project to add sparkle and shine to
the project. Used extensively for all festive creations.
Glow-in-the-dark
Mod Podge – It is again a gloss Mod Podge that can make
the area where it is applied glow in the dark. Best for kids projects to add
that surprise element for them.
Antique
Mod Podge – There
are some who love the look of vintage, aged projects that have an antique feel.
Antique Mod Podge enables you to get that aged look simply by brushing it on. A
slight brown tint is how it works. This formula comes in a Matte finish.
<Mod Podge Dimensional Magic – Dimensional Magic is slightly milky medium that
dries to a clear glossy raised finish. It can be used to highlight or magnify
distinct areas on your project. It makes great rain drops, puddles and water
effect. This formula comes in Clear, Gold Glitter and Silver Glitter.
Besides above, there are some more variants like Kids Mod Podge, Super Gloss Mod Podge, Brushstroke Mod Podge, but the above mentioned 10 varieties are mostly used.
One new variant “Mod Podge Extreme
Glitter” is also being introduced shortly. Keep a tab on crafterscorner.in to
know about it.


How
to Mod Podge
Mod Podging is indeed simple. You
require the following tools / accessories to start :
A clean foam brush
A plate or something to pour a bit of
the wonder from the container
A clean piece of cloth – to prepare
your surface
A Squeegee to press paper, fabric or
other items specially at corners
<!-A Brayer to smoothen the surface by
providing right amount and equal pressure over a larger area and to eliminate
air bubbles.
Besides the above, other elements of
crafting like scissors, knife, ruler, pencil etc. are to be kept handy.
The
Mod Podging technique can be explained in following 8 simple steps :
(from wikihow)
(from wikihow)
Gather your supplies (including Mod
Podge tools).
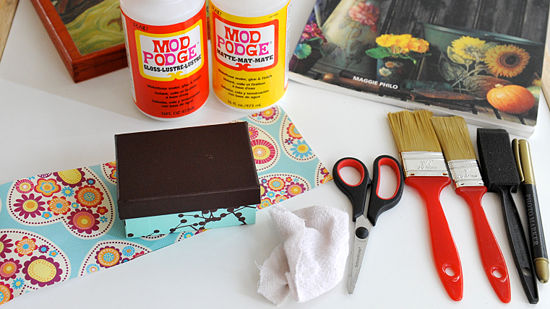
Prepare the surface to be Mod Podged –
by cleaning with a cloth. For harder surfaces, rubbing with a sandpaper and
then wiping clean is preferred.

Select paper / fabric etc. to be mod podged and cut the same to required shape.

Apply a medium layer of Mod Podge both to the back of the paper and to the top of the surface.

Smooth the paper to the surface.
Keep smoothing until you have removed the air bubbles. A brayer is to be used
for larger surfaces.

Allow the Mod Podge to dry for NO LESS than 15 - 20 minutes.

Apply a top coat of Mod Podge to the entire surface and allow to dry

Apply a second coat of Mod Podge to the surface and allow to dry.


Uses
of Mod Podge
Hence the uses of this product is
endless. It can be used as :
Gluing – Because it dries very fast, it is
perhaps the best gluing agent for craft.
Sealing – Mod Podge can be used on terracotta
pots and Shadow boxes as a perfect sealer and water repellant.
Finishing – Apply Mod Podge on any of your
creations and it will dry out to leave a fine layer to make your product smooth
and shiny.
Special Effects – Mod Podge can be mixed with
paint, beads, glitters etc to give that special look to your creation
Once you start using it I am sure you
will discover lots of uses for it.
I had used Mod Podge in my last two
creations posted on crafterscornerindia.blogspot.in. And every time I use it, I fall in love
with the product more and more.


Since this month’s product theme is also Mod Podge, all DT members would be using this wonderful product in various ways to demonstrate its versatility


Since this month’s product theme is also Mod Podge, all DT members would be using this wonderful product in various ways to demonstrate its versatility
Although there are various types of Mod
Podge available at crafterscorner.in, you can start with basic type – Gloss, Satin and
Matte. You can also try the glitter ones – Gold and Silver.
For any queries write us on info@crafterscorner.in
For any queries write us on info@crafterscorner.in
I am sure you would soon be writing
stories about this wonder product, how you have created fantastic creations
using this product. Try some new techniques (like blow drying the mod podge
using embossing gun, to create a textured finish, adding glitter) and share with us.
Before I end this presentation, let me
give you a brief of a revolutionary new product that Mod Podge is introducing
shortly – “Mod Melts and Moulds”. Using these Moulds and Mod Melt Sticks you
can create variety of embellishments. You can combine Mod Melts with glitter,
shimmers, acrylic paints, metallic paint, embossing powder etc., to create
various finishes and shape it in Mod Moulds. The Moulds can be used to create
shapes like various flowers, petals, birds, butterflies, key, crown, and antique
trinkets(wooow). So keep your eyes on crafterscorner.in and be the first ones to pick
this up when introduced.
And remember, this month’s challenge Crafter's Corner # 7 -Bingo! winner
prize is also MOD PODGE. So keep sending your craft creations and get this WONDER
PRODUCT as your prize!!!!


