TABS

Friday, 30 September 2016

AMOR MIO AND SHABBY CHIC CARDS WITH BOB N BETTY

Hello everyone !!!!
Love is the most profound emotion known to human beings.  A feeling that brings one closer to divinity.  Love knows no bounds and is free from all shackles of life. And when the heart finds true love, it lasts forever. Life is relived, redefined and reborn when love enters. Amor Mio--- My Love opens new gates of emotions for two people .
This beautiful feeling, the essence of love, the romance in this relation is so beautifully captured in the Amor Mio paper collection by Bob n Betty. Each design takes us on a journey where love is paramount . The prints perfectly replicate the feelings of two loving souls.

Using these papers , I have created two shabby chic cards. But there is lot more you can do with these. So have a look at my creations with these wonderful designed love themed papers. You can find them here in Crafters Corner.


This is a step card. Such dimensional cards are perfect for bringing out the beautiful details of the subject.
To create this card--- Measure and cut a card stock 7” x 11”. Score at 2” , 4” and fold to make the first step.  Fold down the the remaining card stock to coincide the top with the base.  Use a similar embellishment made from paper and die cut on the top. Add a mat layer using any spellbinders label die. I have used Go create Dies here. Cut out the design from the pattern paper for the mat layers. Add a circle design at the base on a Spellbinder die. .
  Use a similar embellishment made from paper and die cut on the top.

Distress the edges with Aged Mahogany Distress ink. Some texturing is also done using distress inks and stencils.

Decorate the card with Mulberry flowers.

The second card is made using the Beautiful frames with roses-a design included in the collection.


The finished card measures 7.5 “ x 5.5 “ .

Cut out two frames from the paper pad. Remove the middle section keeping the roses intact. Postion diagonally on top of each other.
Add a window die cut in the bottom layer. Cut a filigree circle die cut and add at the base and top as shown.
Add some texture using modelling paste and stencil.
Decorate with mulberry flowers and ribbon.
Add a vellum quote to finish the card.

I hope you liked my creations. Do check out the amazing collection of papers by Bob n Betty available exclusively at Crafters Corner.

Keep crafting and have a good day!!!


.

Thursday, 29 September 2016

DECOUPAGE WALL DECOR CUM NOTE PAD HOLDER WITH HEARTFELT CREATIONS.

Hello Friends!!!
How is everyone doing?? These days I am totally addicted to Decoupage. Thanks to Crafters Corner for bringing the most wonderful decoupage paints -FolkArt Home Decor Chalk paints. These are so awesome that I have not been able to keep myself away from them. Do check out the entire range here.

Today , however, I have something different for you. Being a part of the Heartfelt creations design team, I have been able to give new wings to my creativity. And when two amazing brands join hands then what you get is a most awesome project.
Yes !!! I am talking about Plaid Crafts and Heartfelt Creations. And need I say more because, I am a DT for Crafters Corner also that proudly houses both brands in full range. Crafters in India are so fortunate to have access to these products just because of Crafters Corner.

Now to my project.

This is a Wall Decor piece with a utility purpose. You can use it as a memo pad holder too . I have used the Heartfelt Creations Classic Rose collection and the Plaid crafts paints to make this.
Here is a step by step photo tutorial for the same.


1) Gather all the things needed to create the project.


2) Apply two coats of white acrylic paint on the place mats.


3) Place the pattern paper on the place mats and cut out the portion you need.


4) Make an outline with pencil 4 mm inside the pattern paper on the place mats.


5) Apply brown acrylic paint on the part that does not have paper. (left)
6)  Dry it very well. Apply Mod Podge crackle medium with sponge brush and leave for one hour. Do not apply a second coat.  (right)


7) Apply a layer of White Acrylic paint mixed with green apple colour in the same direction. As the colour dries, the cracks begin to show. Apply in single layer.
Add some green colour on the outlined pencil area with a stencil brush giving a stippled look.


8) Apply a coat of mod podge on the back of the paper and also on the area where it will be stuck.


10) Apply another coat of mod podge and let it dry. Add brick wall texture using brick stencil and texture paste.
11) Make flowers using the Classic Rose Cling stamp and die and shade them with purple colour. Shape on flower shaping kit. 
12) Make leaves using the leaf stamp and die. 
13) Adhere the leaves and flowers on the project as shown. Add the Chipboard frame with photo. Stick the post it notes and add a pencil on side.
14) Colour seam binding ribbon with green colour and tie the two place mats as shown


       Products used

                                                                   
               Classic Rose die                            ClassicRose Cling stamp set                  


          classic leaf die                     Classic rose Paper Pad                      


            Deluxe Flower Shaping tool kit                        Open leaf cling stamp set


Designer dries clear adhesive.                          Mod Podge Matte finish     


        Real Brown -Multi surface paint                           Crackle it Medium


                                                             Texture paste
Soft Apple Multi Surface paint


I hope you really liked and enjoyed this post. Do leave your comments and please feel free to ask us about anything.


Wednesday, 28 September 2016

Altered Box!


Hello everyone! Welcome back to Crafters Corner blog!
Well since I've already started preparing for the upcoming festive season I thought why not do a tutorial on how to alter a wooden box for today's post? Sounds good right?
Well this is what I've created! A shabby chic themed box! Perfect for the gifting season! So lets get started!


I started by painting my box using Prima Marketing Chalk paint in the colour eggshell. I did not prime/gesso my box before using the paint is because I wanted the uneven streaky look of the paint. Plus i used an old paint brush to further enhance the look I was aiming for. If you like the perfect painted boxes you should use a good gesso for sure!


The one thing I absolutely loved about this Chalk Paint is its finish! Its so super matt unlike the acrylic paints I've been so used to which tend to get sticky at times! Also you must checkout the Inks, Paints & tools category on our website We have got such a huge variety of chalk paints in various brands and in some amazing colours!

Moving on to the next step I heat dried my box to quicken the process! I wonder what I'd do without a heat tool? I have low patience hehe :p

Once done I took this super pretty paper pad! Floral Muse by Dovecraft Its one of my favorite paper pads I soo love the shabby chic prints!

Next I trimmed down the pieces according to the size of my box and added tacky tape to them! 

Peeled the tape and adhered them to my box. Next I took a prima frame and painted it with my favorite Prima rose gold paint i soo love this colour! 

Added it to the piece of cardstock closing the window. Next adhere this to the box using 12mm foam tape


I filled in the inner frame with Glossy accents and then used Art glitter- Baubles over it sprinkle them n then tap off the excess. 
The colour is so gorgeous in person the camera does no justice! 
Its absolutely Gorgeous! 

For the decoration I've used few mulberry flowers, die cut leaves and some embellishments from the store! All products used are listed down below!


Hope you all enjoyed today's post!

Have a great day

Hugs 

Anchal Sapra


PRODUCTS USED
Prima Chalk paint- eggshell
Prima opal magic- rose gold paint
Dovecraft- Floral muse 12*12 paper pad
12mm foam tape
12mm Red tacky tape
Blue gems
Mulberry roses
Resin embellishment
Cheery lynn leaf die
Craft sheet
Mod podge silicone craft mat
Sentiment tiles
Gold butterfly
Art glitter- baubles


Tuesday, 27 September 2016

Sport theme Shadow box

Hello Crafty lovers, 

You all may know i love Graphic 45 papers !! So, for my latest project I have tried to create a Sport theme shadow box.!! I LOVE Graphic 45 papers and embellishments, so creating with them is ALWAYS fun! 

Sports are not just a pastime, they are a way of life for many of us, and collecting and displaying sports memorabilia is how we express our team pride. This beautiful paper "Good ol Sport" can help you frame and display your favorite items proudly, whether your game of choice is football, baseball, golf, tennis or soccer. 
I aren't really sport fanatics. So for this project I took my brother pic. He is a harder-playing type of guy. He has always loved his sports, so I thought this sports-themed display shadow box would make the perfect gift for his birthday this year. 


 The Good Ol’ Sport collection has it ALL covered, from football to baseball, hockey and boxing and more.


I am sure you can make the perfect gift for your heros with this papers

Monday, 26 September 2016

Decoupage Part 2 with Anita Kejriwal


Hello everyone... It's Anita here!!
How is everyone doing?? I hope everyone is having a good time creating their favourite projects. I am, at present addicted to Decoupage. A wonderful craft indeed, decoupage not only helps to create beautiful home decor items but is also useful to re -cycle old items and furniture etc.
We are going to use the most popular Folk Art Home Decor Chalk paints by Plaid craft and other products like wax to make our new project for today.
I have also created a video tutorial for this.
Another new product that I am going to share with you all is the Deco Mache Paper.


It is a wonderful paper especially for decoupage and is so thin ---just 22gsm!!! that once adhered to the surface , it looks that it has been painted on the surface itself.
So in my video , I will show you how to do decoupage with Deco Mache papers.
The good news is that Crafters Corner has all the products that you need for this project. And not only that , they are at the price. Plus there is a 10% discount store wide so you get them at more cheaper price.


In my first video here... I  have discussed about Chalk Paints and its uses. Today, I will focus on two more products -Clear wax and Antiquing wax. from Plaid Craft


What is Home Decor Clear wax and Antiquing Wax??

FolkArt Home Decor Wax is a brushable, waterbase, non-toxic, paraffin-infused wax finish used to seal and protect painted surfaces. Allow paint to fully dry 24 hours before applying wax. Clean brushes while wet with soap and water.

How many types of FolkArt Home Decor Wax exist?

There are three different types of FolkArt Home Decor Wax: Clear Wax, White Wax and Antiquing Wax. All waxes provide a protective velvety smooth finish for your projects. When properly applied, Clear Wax will protect your surface without adding color. White Wax gives your project a beautiful white washed or faded finish. Antiquing Wax adds a vintage or antiqued, time-worn look with a warm, chocolate brown, color. FolkArt Home Decor Chalk can be added to the waxes to create your own custom-colored waxes. 
So if you want to give a nice sheen to your projects and also protect it from dust and moisture, then these two products are your solution. It does the same work as Mod Podge as a sealant however it is not a glue like Mod Podge. You can also give a new shine to old furniture, frames etc, by using clear wax or antiquing wax. A nice whitewashed shine can be given by using the white wax.

Why do I need to buff the wax?

After applying the FolkArt Home Decor Wax, it should be buffed to polish and seal the surface. The more you buff, the more you will raise the sheen of your finished project.

Is it same as Varnish?

No both are different. Varnish is for outdoor use. whereas, Wax is not suitable for outdoor projects. With wax , you need to buff the item but do not have to do so with varnish. 

How should I clean my project surfaces after FolkArt Home Decor Wax has been applied? 

Wipe project surfaces with a soft cloth moistened with warm water and mild soap to clean
---------------------------------------------------------------------------------------------------------------
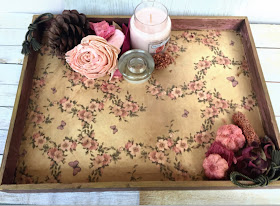
Here is the tray that I made with the above products. Please feel free to ask me about these products. 


I hope you liked this video. I have tried to share this beautiful art with you using the best raw materials. So go ahead and do try this out. Remember to going on a shopping spree at Crafters Corner.


Materials used 


Do leave a few words. I love reading your comments.
Till then happy crafting !!!