TABS

Friday, 31 July 2015

Using tiny stamps from a set

Hello crafty friends,

Neha here. How are you all? Hope you are enjoying the rain. I love this weather. 
Some coffee and lots of crafting...heaven.  

Today, I am focusing on those small neglected stamps which comes in a set. Many times we get tiny stamps like heart, stars, dots or small sentiments along with our main focal point stamp in a set. These are the one which stays mostly unused. Let's ink those side kicks and create some beauties.

For the first card, I am using those three tiny arrows and a sentiment from Penny black Set.


Here is the card.


Pretty simple, isn't it? I stamped those arrows multiple times, in different directions to translate the 'lost' part of the sentiment. Love how it came together. 

For the second card, I have used Loving Words by  Ali Edward. 


I cut a circle with a die from copy paper and used it as a stencil to stamp those tiny flowers. I also masked ,shaded and stamped  a strip at the bottom. I used a sentiment from the same set. Such stamps are great to create your own pattern paper or backgrounds.


For the next two cards, I used tiny lanterns and circle(meant for balloon).


I draw those black strings with black pen and emboss lanterns in gold. Coloured them with different distress inks and added sentiment to finish it.

For the card below, I stamped and embossed that circle on white CS with clear embossing powder. Added  Ken Oliver Colour bursts with lots of water. Allowed it to dry and fussy cut the cluster.


Mount on sea green CS with foam tape & finish it off with some die cut sentiment.


For the next one I masked and colored top of the folded card & added 'thank you' stamp 
multiple times to create some interest, focal point and to emphasise the main sentiment.


For the tag i have used small heart stamp multiple times to form a square pattern. 


So, how was that? Hope you enjoyed it and you will love those tiny ones from your stash. 
And if you do, Please share on Crafters Corner Facebook Page. 

Buy for now!


Monday, 27 July 2015

Burlap Mini Album

Hi friends, 

This is Arjita and today I will be working on the newly launched scrapbooking jute sleeves/pockets which I received few days back. Initially I was sceptical about the project but then finally decided to go ahead with a Burlap mini album and use the sleeves as ready made pages and pockets where I can insert few tags/photomats.
These burlap sleeves measure 8 1/4 inches L by 4 1/2 W inches . I think its a pretty decent size for a mini album and we can stick some good sized photos. Each sleeve comes with a stitched pocket and a beautiful lace is already added which make s it look all the more pretty. Since these pockets are attached with laces I wanted to carry this shabby chic look in my entire mini. 
I used a very simple binding system and poked the two binder rings through all the six sleeves. This immediately gave it the look of a mini album and I was ready to start embellishing it:)


I decided to use some shabby chic papers I had in my stash and luckily I found the flowers and other elements of the same collection in our store .
The collection is called "Prima coffee break" which is so pretty and perfect for this album.
I have tonns of picture for u so that u can have a good look at the album from all sides and do check out the video tutorial for all the detailed instructions.


I used  lots of pretty laces , trims and some seam binding to give it extra glamour .
This is the front page of the mini and it's so romantic and chic 😍
I love the tag which says " oh darling , it's coffee time !" So cute ....
I like to colour coordinate my album pages and I put in a lot of effort to select the papers and embelishments . This gives it a good visual treat and makes the album well planned :)


The album turned out to be very chunky  and pretty and I think it will be a great gift for someone romantic and who loves coffee....lol
This is the video link for the tutorial.


I hope u had a great time watching this video and do try out this amazing mini .
Thanks for stopping by ...
Hugs
Arjita 

list of supplies:
jute pocket sleeves
craft paper
prima coffee break flowers
prima net flowers-calm
binder rings
distress ink-vintage photo
distress ink-victorian velvet
fiskers scissors
craft mat
prima lace trim-white

Thursday, 23 July 2015

Don't forget to fly!


Good Morning!

Its me Nupur!
back to play..
back to have fun 
and back to create 
another art journal cover.
- - - - - - - - - - -  - - - - -  - - - - - - - - - - - - - - 
The future belongs to the one 
who dares to dream...
all your dreams can come true 
only if you have the courage
the strength
the passion
to pursue them..
Believe in your dreams
Believe in yourself
open your wings and
fly..fly..
fly high 
to achieve your dreams...
Dare to dream
Dare to Believe.. 
Never lose that strength
nor that confidence..
most importantly never ever
forget to fly.

DONT FORGET TO FLY


Based on the size of your journal take a white - heavy card stock
and trim it as per the journal size.
I have trimmed mine to
(5.5" by 8")
( I always prefer creating my art journal cover page on a 
heavy card stock and then matting it on the original journal to keep it more sturdy)

1, 2, 3...
and here we go
Lets ground the surface with the 
Art Basics - Finnabair's clear Gesso.
Using the heat gun, heat the surface until its completely dry.


Using the pallet knife take the Art Basics - Finnabair's White Heavy Gesso
and spread it across the sheet as shown in the image below.


I stencilled the following pattern.
Using the heat gun. Dry it.


Here comes the interesting part,
Colouring, colouring and more colouring
Using the Distress inks by Rangers 
add the colours onto the textured surface
with the soft water brush and the Mini mister.


Stamping, love the personal touch it adds to the project.
The amazing Finnabair cling stamp - Dont Forget to fly is to die for.
I couldn't help myself but use these gorgeous butterfly stamps and the sentiment called for my attention.
Using the Black Archival Ink, I have stamped the images onto the white paper
along with the sentiment and then fussy cut them.


Once you are done stamping, 
its time to colour the beautiful butterflies and the sentiment.
Happy and bright colours 


and here comes some stamping
 Using the Black Archival Ink I stamped few of background textures 
to make the cover stand out.


Tear a page from an old book keep trimming it using your fingers in a way you like
or as shown in the image below and colour it.
and stick it onto the textured cover using the Art Basics Finnabair Soft Matte Gel  


And it is all ready for some sparkle here and there!
All that sparkles makes the heart flatter.
Thats exactly how I feel using the amazing 
Art Basics - Finnabairs Glitter.
 Using the Art Basics Finnabair Soft Matte Gel I mixed the golden glitter 
and then stenciled the amazing pattern
onto the background to add that sparkle.


Last by not the least.
I love splattering. 
Using the amazing Art Basics Heavy Black Gesso
splatter onto the page.
Using the Distress ink, 
darken the edge of the cover used in order to highlight.


Viola! and its ready...

Now paste it onto the Journal cover using the super tacky red tacky tape. 
If you ever get scared about trying you hands at art journalling.
Think about why you are going to start creating it. 
And believe you me, 
you don’t have to have any other reason than, 
“I want to.”
and this will do wonders.

- - - - - - - - - - - - - - - - - - - - - - - - - - - - - - - - - - - - - - - - - - 


Products list:

Art Basics Finnabair Soft Matte Gel
Finnabair cling stamp
Black Archival Ink
Scattered Straw
Mustard seed
Vintage Photo
Mawed lawn
Evergreen bough


- - - - - - - - - - - - - - - - - - - - - - - - - - - - - - - - - - - - - - - - - - 
I hope I have inspired you create!
Have a crafty week!
Thank you for stopping by
...Nupur...

Tuesday, 21 July 2015

Prima Art Basics contd. - It al about the Gels!

Hello everyone!
Jaya here .

 SO today I am going to talk about the gels. There are 2 gels in the Finnabair Art Ingredient line . The soft gels and the 3D gels. 
Lets talk about them in detail.


Soft gels

Two types-


Picture courtesy- Google

Transparent, flexible acrylic medium.Dries with gloss finish

Picture courtesy- Google

                                    
Transparent, flexible acrylic medium.Dries with matt finish

-The soft gels are transparent and flexible acrylic mediums that fry clear and permanent.these are really easy to spread because of their thin consistency.
-These are perfect for using in photo transfer techniques, as an adhesive( dry clear and hold strong) or as a varnish
-Non toxic ,archival safe

What Soft gels can be used for?

-Soft gels are perfect to be used as liquid glue to glue down your embellishments,papers,glitter  etc. You can also use it as a varnish or as a sealer to seal your paints or other mediums.

-It is a good resist medium and gives beautiful resist effects with paints and sprays.


-The soft gels are perfect for image transfer techniques.

-You can create your own mediums with these gels. Just add the pigment powder and you are ready to go with your customized paints. It can also be used to increase the bulk of your paints.


Difference between Soft gloss gel and soft matt gel

The difference between Soft gloss gel and Soft matt gel is basically in the finish of the end product. While the soft gloss gel dries with a gloss finish the soft matt gel has a matt finish to it when it dries. Rest of the properties are just the same and it totally depends on your choice.


Tips when working with soft gels

Always use paint brush,sponges or stencil brush when using the gels. Since they are very light consistency avoid using palette knifes to minimise mess.

Do remember to seal off you image with soft gel after the image transfer is complete. 

Gels are good to be used as varnish or sealer for any project with crack;e mediums.It will prevent chip off's and keep the crackles in place.

Gels resist non permanent medium. Use this to give beautiful resist look to your projects.

Wash your equipments after use using water, soap or wet wipes.


3D Gels

Two types-

Picture courtesy- Google
Semi- transparent, flexible acrylic medium.Dries with gloss finish

Picture courtesy- Google
Semi- transparent, flexible acrylic medium.Dries with matt finish


-These are semi transparent and heavy body acrylic mediums.
-Permanent and resistant to water based mediums when dry.
-Non toxic archival safe.


What 3D gels can be used for?

-The 3d gels add great amount of texture as well as dimension to your projects.They withhold the shape when dry which adds to the dimension of the creation.

-It can ones again be used as an adhesive and holds embellishments and other 3D objects well.

-They also act as resist and can be used in a similar way as the soft gels.They are resistant to non permanent colour mediums after drying completely.

-You have options of creating custom made paste. Try these not just with pigment powder and paints but also with glitter, flakes and beads!


Difference between 3D gloss gel and 3D matt gel

The difference between 3D gloss gel and 3D matt gel is basically in the finish of the end product. While the 3D gloss gel dries with a gloss finish the 3D matt gel has a matt finish to it when it dries. Rest of the properties are just the same and it totally depends on your choice.


Tips when working with 3D gels

Try making your own custom pastes. Use pigments,paints,acrylic colours mixed with some perfect pearls powders, flakes,glitter or beads. Make your pastes and store them in air tight containers for later use. The possibilities are many!

Use palette knife to apply the paste for great dimension. Avoid palette knife when using it to glue down dimensional embellishments.Use your finger instead to control the amount of application.

Always clean your brushes and stencils after use with water or wet wipes.


                  Difference between Soft gels and 3D gels

While the gloss gels labels are marked in blue( Pale blue- soft, Bright blue- 3D) the matt gels are purple/mauve in colour(  pale - light, dark- 3D).

When used as an adhesive while the soft gels are good for sicking papers and light embellishments the 3D gels can be used for heavier and 3D embellishments.

The soft gels are thin in consistency and cannot hold form therefore good as varnishes and sealer while the 3D gels are good for dimensions and textures.

Application of soft gels is with paint brushes,stencil bushes or sponges while of 3D gels is good with palette knife. 


For products visit Crafters corner-

Prima Marketing - Finnabair Art Basics Soft Gloss Gel 8.5oz

Prima Marketing - Finnabair Art Basics Soft Matte Gel 8.5oz

Prima Marketing - Finnabair Art Basics 3D Gloss Gel 8oz

Prima Marketing - Finnabair Art Basics 3D Matte Gel 8oz

Tim Holtz Distress Ink Re-Inker .5oz

Prima Marketing - Art Ingredients Mica Flakes 1oz


That's all from me today. Cya soon.
Happy crafting! 


Sunday, 19 July 2015

Collage Clay Art

Hello everyone!
Today I am here to share a video tutorial on the Fabulous art introduced in India by Crafters Corner! Its called Collage Clay art! My fellow DT Isha did a post on it recently and I am here just to share my creations as I was way too excited to try my hands at this super adorable art form!

Let me show you first what all I created!


I made a small pocket mirrror


A table clock

and a phone cover!

Aren't they all so adorable and yummy? 

Collage clay art is also popularirly known as DECODEN. Decoden is a Japanese art form of decorating mobile covers. Where as Collage clay art is not just limited to moblile covers but soo much more! Its super fun and very easy.

Our store has introduced special variety of High quality Cabachons which are perfect for Collage Clay projects. The finish is excellent, we have a vast variety of sizes and they all are super cute.
Lots of sets o Cabachons will be uploaded soon - example if there is a set of clocolates then it will have all sizes and colours of it.

Now let me show you the video

Hope you all like it!

Do feel free to ask any questions

Hugs
Anchal Sapra 


Friday, 17 July 2015

Crafters Corner launches Collage Clay In India


                    CRAFTERS CORNER LAUNCHES 
          
                               COLLAGE CLAY ART


Greetings Beauties :)

CRAFTERS CORNER proudly presents you the new art for the first time in INDIA -
                                            COLLAGE CLAY ART

As promised in my last post I have something very very  very exciting  and awe- inspiring , stupendous cool stuff for you all. The most amazing , awesome, wonderful, the gorgeous, the yummiest , the fantabulous  COLLAGE CLAY from MOD PODGE family by PLAID ENTERPRISES is now available in India, at your very own favorite craft store, the one and only CRAFTERS CORNER.


My my  what else I can say Thank you Ms. Shalini Mittal and the entire Crafters Corner team for bringing us the best of products, introducing all of us to new forms of art and above all making things available for us right in hands.

Oh my god … where to begin from??  Ahhaaa how about starting from WARNING/DIS CLAIMER
 ( Laugh out loud)

WARNING-  Picture heavy and long Post!!!!! Sit tight , eyes wide, I bet you can't stop drooling over these gorgeous gorgeous products and projects that I have here for you all. Don’t blame me Ladies if you go CRAZY .. Trust me it’s damn yummmieeeeeeeeee (oops)

DRUM ROLLS
Let’s welcome the STAR of our show 

                                          THE COLLAGE CLAY by MOD PODGE


On behalf of CRAFTERS CORNER Team, I am thrilled to introduce Mod Podge Collage Clay Art in  India, a versatile whipped clay that you can use to easily embed and embellish your favorite projects! Craft experts Cathie & Steve were so smitten with the crafting technique of Decoden from Japan, that they worked with Plaid enterprises to develop Collage Clay for the Mod Podge family. You can use Collage Clay with Mod Podge Mod Melts and Molds, trinkets, cabochons, buttons, rhinestones, and anything else you can think of! You can also use it in mixed media arts, 3D collage, assemblage arts, 3D stenciling, creating mini faux food and much more!!!


PRODUCT DESCRIPTION 


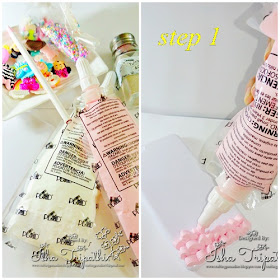
- Mod Podge Collage Clay is lightweight whipped clay. It is used to embed decorated Mod Melts embellishments. It comes with 3 tips and a cap. The tips included are a star tip, round tip and wavy tip. And Lastly The finger technique - the messier the merrier :)


- Collage clay comes in two colors Vanilla white and Strawberry Pink
- It's not EDIBLE. 
- Can be used on porous and non porous surfaces.( name any surface it can work on any thing - sky is the limit)
- Dries in 24 hours.
It gives u a spongy feel after drying.....yummmmm


Mod Podge COLLAGE CLAY teams up with drizzle paint to make your projects more yummier.. 

Picture courtesy- Plaid Enterprises


You all will be very glad to know that CRAFTERS CORNER has come up with more variants in drizzle paint. They have imported the ice cream toppings under the brand name of CRAFTERS CORNER only. Have a look at the awesome colors of ice cream toppings by CRAFTERS CORNER.These are from Crafters corner - are light, flowing  and little thin in comparison to drizzle paint form Mod Podge. So you need to use two layers of the same or a thick layer of sauce to cover your surface.
It looks amazing when sprinkled on the collage clay as its very yummmmm to look at .


CRAFTERS CORNER ICE CREAM TOPPINGS


What say Ladies ??? I am super excited and thrilled to work withMOD PODGE COLLAGE CLAY( I wish I could contain all the excitement in me). Wait a minute If you thinking that I am done ... no way gals we have so much more for you. 

CRAFTERS CORNERS Proudly presents you the the BEST EVERCABOCHONS you could ever think of. When I say best - trust me they are the best quality you could ever think of. Crafters Corner has come up with most adorable, cute, charming, yummy, lovable, enchanting range and huge variety of CABOCHONS.
the best part is all colours schemes have been considered very well so that u are all set ready fr any occasion to work for ....
Also the best part is they are completely handmade and comes with extremely good finishing...
And the bestest part is we have got more than 100 of designs which will be online very very soon....

Now hold your breath ladies...
take a look at the samples which I have lootedfrom Crafters Corner.. aren't they yummy <3  
stop drooling gals ( they are all mine.. hahahaha)
I know you cant find many of  them online as i looted them...lol....
Nono .....let me be serious ...they will be online very soon ....


                 AWESOME CABOCHONS ( my awesome loot at CRAFTERS CORNER ) 


Adhesive sticks - This is just one small piece of wonder. It make super easy pick tiny miny embellishments, As soon as your embellishments come in contact with glue it will release the em-bellies on its own.
This is the original adhesive picker which has an ultimate grip of holding the small pearls (soon online ) n rhinestones ( soon online ).....


Fillers and sprinklers - They are handmade from FIMO clay one of the best quality. Look at these rainbow crumbs  gorgeousness how detailed and fine they are. 
I am sure you all Don't wanna get confused with candies :P 
These are another topping for your clay ....which makes work more attractive.

Crafters Corner Cabochons are handmade and are of premium quality. There are two types of cabochons in terms of material used - 

1- Matte Cabochons
2- Glossy Cabochons 

WHAT ARE CABOCHONS ??


A cabochons  can be made from just about any kind of stone as well as ceramic, porcelain, clay or even wood. The materials doesn't matter. The defining elements of a cabochon have more to do with the shape of the component: it is flat on one side and domed or rounded on the other side.
                                         Pronunciation: Cab-O-Shawn


SOME TRIALS AND TESTS SESSIONS

Well we had conducted some trials and tests with the product before its Launch and it turned out to be a fun session of playing drooling and above all crafting .. and creating gorgeous samples for you all. I would like to thanks Shalini Mittal  for letting us go mad with these and enjoy ourself to the fullest. It was a fun learning session with crafty beauties Ms. Shalini Pahwa and Ayushi Aggarwal.
Thank you ladies it was great time with  you all. 

Now the samples which we made -- 


Allow your projects to air dry for 3 to 4 days before actually using it. The clay once dry will remain soft and bouncy but dry.
Kids will love this awesome product

And Some More Pictures - 


DOOR HANGERS 

The one is white is finger technique and in Strawberry Pink is Star tip technique. They all look so amazing. The Pink hanger was done by Shalini Pahwa ( She has super clean hands and did wonders at the time of testing).
Also Ayushi Jatin Agarwal was a big help in preparing samples with us...


PHONE COVERS


                       DIY PHONE COVER - PICTORIAL

I have this pictorial for you all showcasing how to make your own phone cover.

Material Required-


1-  Collage clay.
2-  Old phone case or any new .
3-- Cabochons.
4- Adhesive stick .
5- Mod podge drizzle paint
6- Glitters ( although any glitter will work but i suggest you to strictly go for Elizabeth craft glitter , Clearsnap dust or Glamour dust as these are super pretty and shiny and also they are dust so looks great ).


                                                                              Step 2
                                                                               Step 3
                                                                            Step 4
                                                                             step 5


Viola!! we are done so simple . It's fun to do some DIY's .
Don't you think they look like candies from candy stores hehehehhehe ... mind you not to be eaten but so tempting.


Now its time to order your very own set of Collage clay and get crafty- create your magic.
But did u see how we welcomed our new CRAFT  in India....let me show you some sneak peaks.....
We had a full day of live demonstrations going on...and Shalini di did all those demos for all the visitors.....
It was a great launch and a Mega event for us....
Hope u all enjoy these beauties and our precious moments....


I hope you all liked the projects and I really really hope you all found the post helpful. If you have any questions and doubts please please please leave us your comments below and  I will more than happy to help.

Have a nice day
Love and Hugs
Isha.