TABS

Wednesday, 30 July 2014

Super excited

Hi all.....
I m shalini this side .....I know I am writing after such a long time but trust me my hands were itching to write for so long.....
And today as the title says I m super excited to share with you that I have very good news for you all......
So lets start with good news only.....
U know when I started crafting there are many people I  used to look forward and admire their work and there are many whom I used to see n think OMG how do they manage to do all this......
And as far as writing a blog post is concerned I m super lazy and that's why I don't do any posts n tutes ( so bad of me actually ).....lol
But there is one lady I would like to tell you about her .....if u go to her blog u will have a jaw dropping reaction because the kind of explanations n tutes she writes ...I think nobody can do that.......her write ups are mind blowing....she writes in such a good manner with simple language that everything becomes super easy.....also I must say that  she has the ultimate patience to describe each step which is outstanding.....
I love her just because she is so damn good at her tutes and now the best part is .....she is our proud DT .....yipeeeee.........And she will be doing her great reviews and tutorials for us......I m super excited.
So here is she .......my darling doctor.....

                                                                   DR. SONIA


And here is little about her
 
Hi everyone I am Dr Sonia Suprabha Venugopal ,an ENT Head and Neck Surgeon from Kerala now settled in Bangalore. I was a proper book worm and studious girl all through my childhood and college years and never had a chance to explore my creative side till I had a little girl of my own and had to make crafty school projects for her! I infact started my  blog Cards Crafts & Kids Projects just to share our little school projects and kiddy cards...the blogging bug bit me and crafting evolved into a passion! Crafting for me is a wonderful distraction and a beautiful stress buster! And though I love crafting its strictly a hobby for me. Hobbies tend to die if not nourished  especially in our madly busy lives and I must confess one of the reasons I accepted a place in Shalini's Crafters corner Design team is to keep my crafting passion alive by challenging my creativity a bit more !! If I may use a medical simile--Shalini has her hand right on the pulse of the crafting world and I am super excited and thrilled [ and a bit scared too!!] to be on her Design team!
 
 
WELCOME SONIA.......
SO now look forward to her post tomorrow......
So I will catch u again with some good news ....
Hugs
Shalini.


Sunday, 27 July 2014

Gift for someone u love ....

Good morning Crafters...
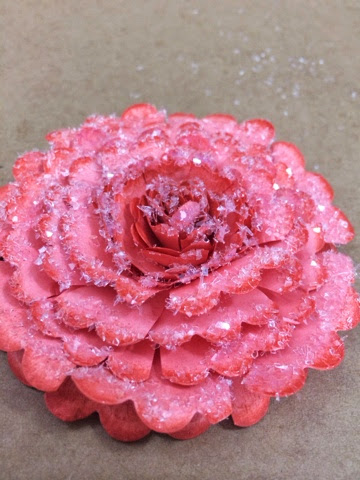
Feeling very proud of my self today as I cud create a beautiful flower using a basic spellbinder die....lol
I want you all to dig in to your collection of dies and give them a new definition.
It was quite challenging and fun !!
We all hoard dies which create very specific things like a flower , border or frame...
guys now it's time to twist and turn your creativity and create wonders by rethinking about their use.
My first attempt was not that complex and i am sure lot of us have these dies...so what are we waiting for ....
Let's begin
Step 1: pick up 4 adjacent scalloped circles dies. Cut them out from your favorite paper. ( 3 each as few extras are always good to keep)

Step 2: sponge the edges with prima chalk inks to add interst .
Step 3: cut out a circle in the centre of all the precut circles . This helps in moulding the flower and to keep it flat from the base.
 Step 4: cut a slit after every 3 scallops and start moulding the flower and give it some creaes and softness.

Step 5: do the same to all the layer...easy isn't it? 

Step 6: by moulding bending and cupping the layers I assembled this gorgeous flower ...

Step 7: add glitter or diamond dust in top  of the flower and it will the most glamourous flower u have ever seen.😊

Now it's time to add it to your project and it will b the show stopper for sure...
I added it over a heart shaped box and it has become so attractive and pretty ..


Hope u will give this a try and do let me know what u feel about this tutorial
Have a gr8 day..
Hugs
Arjita 

List of supplies:
Doily , lace, rhinestone ( from stash)
copic markers


Friday, 25 July 2014

Money Wrap

Hello everyone!
How are you all doing? I'm soo enjoying the rains!
Well Rakhi is around the corner so I wanted to make something festive. In India a lot of us gift money so money wraps are such a necessity so I thought of making one!
Here's what I made.


Steps-
I created the envelope using my score board and paper trimmer.
The pattern paper is from DCWV- The Mariposa stack Its my favourite paper its hard to cut cause its wayy to prettyyyy! I adhered it to my envelope using red tacky tape. If you havent tried it yet I strongly recommend it to you. Its very sticky and you'd never have a project with the paper peeling after few months. I've created the larger rose using Joy Crafts die. I've inked it using seedless preserves distress ink and aged mahogany distress ink. The small roses are ready made mulberry flowers. The doily die cut is from my stash. I've added the cute clock charm and chandelier charm from the store. We have an excellent variety of charms in our store do check them out!
I also fussy cut some butterflies from the paper pad. Aren't they pretty? I've used the new parchment scissors to cut these the scissors are super awesome! They are perfect for fussy cutting once you use them you'd be addicted to them!
Now to finish my envelope I've added a border to the edge its a die by marinne. Next I've used my favvv product = Liquid pearls! They look so pretty!

Hope you all liked it!
Have a gr8 day! The list of products is down below.

And don't forget to checkout our website we are offering a 10%  off on Joycraft and Marinne dies
Hugs
Anchal Sapra

LIST OF PRODUCTS USED
1)Martha Stewart Scoring Board
2)Tonic Guillotine paper trimmer
3)Craft sheet
4)DCWV Mariposa stack
5)Joy Craft Flower 1
6)Distress ink- Ages Mahogany
7)Distress ink- Seedless Preserves
8)Ink blending tool
9)Ink Blending foam
10)Clock Charm
11)Chandelier Charm
12)Tacky Tape
13)Parchment Scissors
14)Tonic Scissors

Monday, 21 July 2014

Vellum flower and a tutorial

Hey everyone!

Sindhu here. I hope you are all doing fine and enjoying the gorgeous inspiration by my fellow teammates. I have a card and a stamping technique to share with you today.

I'll show you the card first.


Here is the close up of the flower...


Steps I followed to make this card....

1. Die cut a piece of vellum with the Spellbinders Rose creations die. (I excluded the largest flower in the set).
2. Die cut a leaf (medium size) from the same die set.
3. Slide your Memento dew drops over the die cut vellum and wipe with a tissue to and you'll get a uniformly colored die cuts.
4. I used five different colors for the flower.
5. Used a forceps to give more details to my flower.
6. Secured the flower with a brad and then stuck those vellum leaves.
7. Assembling the card was easy. :)

Now...as I had promised, here's a small picture tutorial on reverse stamping.


I made a mirror image of a bunny from a stamp set I have. You could do this with any image.


I hope you like the card and the tutorial.

I want to give total credit to the person who made this tutorial. I had watched this video of reverse stamping here a long while ago and happened to try just recently...Here's the original link where I found it.
http://papersmooches.blogspot.in/2012/02/16th-day-of-our-celebration.html

List of supplies used...
Dies-
Spellbinders rose creation die

Papers- 
Echo Park Paper 'So happy together' 6x6 paper pad and 
Echo Park Paper Sweet day collection kit

Inks-
Memento gum drops
Memento Rhubarb stalk
Versafine Onyx black

Stamps-
Hero Arts 'Things we love' stamp set

Take care everyone!
See you!


Saturday, 19 July 2014

UTEE "Faux Glass" Flowers

Tejal here today with  you.....

This being a month of flowers at Crafter's Corner...we are show-casing different types of dies and flowers that can be made with them..Sindhu,Anchal and Arjita have already shared beautiful posts with you...Do check them out if you haven't..

And our store is stocked with loads of dies for making flowers...Some of my favorites are
the Rose Creations Die, The Tattered Florals, Joy Flowers Dies, etc... you can find many more in the store!!

So today I'm sharing how to make a flower embellishment using UTEE or the Ultra Thick Embossing Enamel. As I mention in the Video...the UTEE comes in Clear, White, Black , Gold, Platinum
I've used Clear and Platinum in my Video.


These are what I show in the video...so go ahead, click the play button and enjoy!!

And as always feel free to leave me any questions, comments or suggestions!!

                              
 Products
Clear UTEE
Platinum UTEE
Rose Creation Dies
Clear Embossing Powder
Craft Sheet
Versamark
Heat Gun
Lindy Stamp Gang Magical Mica Powders
Hero Arts Flourish Stamp
Art is - TCW Stencil 
Indie Chic Brads (Centre of the flowers)
 Non Stick Tweezers

Tuesday, 15 July 2014

Luggage card!

The monsoon is finally here and we are enjoying the nature's beauty all around us.At our blog we wanted to wake up our flower dies which have been sleeping  for some time....

Anchal created the lovely teal flower with the Spellbinders Rose creation's die...another die from the same family designed by Donna Salazar is the 
Spellbinders Carnation creations and I picked that one to create my bloom for today's post.

I gathered around 3 of each petals from the die. Added a tiny bit of shading by chalk ink ,then moulded , cupped and assembled the flower together with my Glue gun.
The leaves are also in the die set and are a perfect match .

Created this faux leather look with the help of distress inks and look at the adorable heart which is colored heavily with glossy accents.

Here is the side view in order to give u an idea of how dimensional the flower is...
It's a very pretty bloom and can bring so much of joy to the recipent life.

This feminine luggage has all the favorite girly things ....bloom ,bling , charms, ribbon and a cute heart .
Gift this to a lady who is all set to explore the world and she will have a huge smile on her face..

Hope u like it..
love reading your appreciation and comments ...☺️
Hugs 
Arjita 


List of supplies:
charms 
Sequins, ribbon (from stash)


Saturday, 12 July 2014

Tute on Shabby chic rose!

Hello everyone! How are you all doing?
Well the theme for this month is creating flowers using dies! I am here with a quick tutorial for all of you!
Checkout this card I have made! Isn't the bloom lovely?


Lets get started!!
I am here using the rose creation die. 
You will require 6 die cuts in all 3 of each size. 
Here I've used card stock for making the flower. 


I've inked the centre of the flower with pumice stone and the outer edges edges with broken china. Make sure you ink both sides.

Now using a mini mister lightly mist the flowers and begin pinching the petals like in the picture down below. You can add some perfect pearls to your mini mister to add a nice shine to your flowers.
Here's a close up of the petal
Pinch all the flowers like in the picture and begin gluing the die cuts using hot glue. 
Once you have all the flowers glued use a ball tool and foam pad and press the centre. 
If your petals are pinched tightly you can open them up a little to give it a frill kind of look. 
You can add a brad/ pollens or pearls to the centre and your flower is ready!


But as you all know by now I am a person who loves bling and embellishments so I added some liquid pearls randomly to the edges of the flower. 


INSTRUCTIONS
I created the card and inked it with pumice stone, The pretty pattern paper is by Kaiser craft
Its so pretty! I love the paper pad it has such a variety of sheets- Textured, foil sheets and the best part is it has sheets with matching die cuts! The pattern paper was inked with walnut stain adding the perfect vintage feel to it. Next I've used stampendeous shabby embossing enamel along with some versa mark. I randomly dabbed some versa mark to my card and sprinkled the embossing enamel and het set it, It looks very pretty in person my camera couldn't pick the details.
Now When i started arranging the flower I noticed i needed my flower to match that embossing enamel so i subbed some versa mark to the edges of the flower and added some embossing enamel to that too.  The reason my flower looks a little different than the one i showed in the tutorial.

I've added some lace from my stash to the card and arranged the flower along with my favourite die Chole stem. I inked the stem with walnut stain. Arranged the flower on top, The sentiment and die are by just rite and the pretty dove is from the store! It looks super cute and immediately brightens up the entire project.

Next I cut the insert and die cut the edge with my favourite die= Sizzix Distressed Doily! I soo love this die If you like making scrapbooks and 3d cards its a must have! I inked the edges with broken china and walnut stain and then added the embossing enamel to it. That enamel is soo good! It added the perfect shabby feel to the project. I've added a bow and a stick pin to it.
Hope you all like it!
Do leave some love and feel free to ask any questions!
Have a good day!
Don't forget to check out the awesome floral dies we have got in our store!
Hugs
Anchal Sapra


PRODUCTS USED-
1)Spellbinders Rose Creation Die
2)Sizzix Distressed Doily Die
3)Memory Box- Chloe Stem
4)Spellbinders- Vintage label seven justrite Die
5)KaiserCraft Blae & Ivy Paper Pad
6)Brown Archival Ink
7)Versa Mark
8)Liquid Pearl- White
9)Liquid Pearl Gold
10)Stampendeous Shabby Embossing Enamel -white
11)Resin Dove Bird Embellishment
12)Scoring Board
13)Tonic Trimmer
14)Tonic Scissor
15)Cutting Mat
16)Craft Sheet
17)Prima Golden Swirls
18)Distress ink Pumice Stone
19)Distress Ink Broken China
20)Distress ink Walnut Stain
21)Mini Mister
22)Ink blending tool
23)Ink blending foam


Friday, 11 July 2014

Burlap flower with a bow die.

Hey everyone!

Hope everyone is doing good. I've a pretty card and a mini tutorial to share today.

I made a burlap flower with MFT Dainty bows die. 


I did some in lay die cutting and finished my card with a pretty sentiment from Avery Elle Laurels stamp set. 

I used a Hero Arts flourish die in my stash but you could you just any flourish die.

There are some very pretty flourish dies in our store right now which you could use.
Cheery Lynn Fanciful flourish
Tropical flourish
Memory box Geneva vine
Memory box Honey blossom spring


The very pretty papers are from Prima Rondelle 6x6 paper pad. I absolutely LOVE this paper pad. The soft tones make it so beautiful and pleasant to work with. I used two papers from the same set. one for the die cut, the other for the negative.

If you want to check out this inlay die cut technique, here's a video by the awesome Jennifer McGuire Die cut in lay technique.

That is it from me for now, see you!

Take care...
Sindhu.

Tuesday, 8 July 2014

Change of Results for Challenge No 17

Hello Friends & Fellow Crafters.
This is Riti Poddar here with a Change in the Results for challenge #17 - 'Stamp.Color.Cut'.
We are really sorry about this confusion & inconvenience.

There are so many crafty products which are available everywhere in the market that keeping a track of all of them becomes very difficult for us !
Thousands of stamp sets are available & are being added everyday.
It becomes difficult to sometimes recognize the stamp that has been used in the project.
For our Initial Winner's Card for challenge #17, something similar happened. We couldn't make out whether the stamps were colored or just inked & stamped.
It was brought to our notice by a fellow crafter & we did have a word with Indira about the same. The stamps were just inked & stamped on paper, where as we were looking for some coloring in the stamps. Anyhow, She was very Co-operative & Kind enough to agree to the change in the results & wanted a fair decision to be taken. Thank You Indira for the thoughtfulness & Co-operation ! We really appreciate that !

Of course, from our end we want to rectify this mistake & choose a New Winner.
We always have & will try our best to be Fair to everyone! It's just that we have had so many wonderful entries & appreciate the fact that each month all you talented crafty people out there create & share your awesome projects with us and participate in our challenges. We Want to try & select the very Best and be fair to each one of you. We dont want to overlook any entry which is why we see each & every project very carefully !
But sometimes there are exceptions & in this case I hope you all will understand & co-operate with us !
Once again I apologize for all the Confusion & in convenience caused !!

The New Winner is :
Entry #20 - Anita Kejriwal -for this stunning Hydrangea Card...
Love the tone on tone distressed look & that Hydrangea looks just Perfect !
Well Done Anita !! Congratulations !

You get this super cute Stamp Set from Penny Black !! Happy Stamping !!!
I know you'll enjoy stamping with these cuties.......


P.S. Mail us at: info@crafterscorner.in with "WINNER" in the Subject Line to claim your Pize & Badge !

Next up is Our Top 3 entries (in no particular order)

Entry #1 Nupur Priya
with this super gorgeous Card with a matching envelope !!
Lovely Color palette chosen.. Awesome Job Nupur !


Entry #2 Sathya
with this Lovely Floral Card...It's so feminine & Pretty !
Fresh Colors & These flowers create magic together !
Great job Sathya


Entry # 12 - Catherine Joseph!!
With her Adorable Prima Doll card. Its such a fun bright Birthday Card ! Well Done Catherine !


P.S. Mail us at: info@crafterscorner.in with "Top 3" in the Subject Line to claim your Badge !


Now on to our Honorable Mentions :
Entry #4 by  Deepti Stephens with this super cute card with lovely Fussy Cut Girl !!
Great Job Deepti ! Love the background Deepti !


 Entry #9Ruchi Crafeteria
with her cute little teddy card. Look at all the Fussy Cutting she has done...Great Job Ruchi !


Entry # 19 Manu Gupta !
With her Lovely Tag....so colourful & Bright !!
Very Pretty tag Manu !
Congrats !!


Girls Please email us at info@crafterscorner.in to Claim your Badge ! Mention Honorable Mention in the Subject Line !

OK.............Now for the Random Winner !!

I want a number between 1 and…
Result:
5
Random number code based on JavaScript documentation on the Mozilla Developer Center.

the Random Winner remains the same - ENTRY #5: Khusboo Banka !  CONGRATULATIONS!!  P.S. Mail us at: info@crafterscorner.in with "Random Winner" in the Subject Line to claim your voucher!


Once again CONGRATULATIONS! to all the Winner, Top 3's, Special Mention & Random Winner !
A huge Round of applause for you all !!

That's all from Me friends.
Don't forget to check out our store CRAFTERS CORNER for all kinds of Crafty Supplies.
Also keep checking our Blog for some amazing Project ideas, Products Reviews, Techniques & Tutorials, Videos & some very useful Tips from our very Talented DT !!

Thank you All...
Keep Sharing,
Hugs,
Riti !