Followers

Tuesday 29 September 2015

An Introduction to Alcohol Inks


Hi friends Dr Sonia here, posting at Crafters Corner after quite an interval! My personal blog has been very active this month with the numerous Teachers Day Gifts my kiddo and I made but they were all very simple projects and it honestly feels good to be writing an in depth challenging post!
          This post is an in depth introduction to the fascinating world of crafting with alcohol inks. One of the beauties of alcohol inks is their use not just on paper but on myriad surfaces and hence their appeal to different types of crafters such as the polymer clay artist, jewelry maker, recycling crafter and even the professional artist!
I will discuss the different techniques using alcohol in another post.
What are alcohol Inks?
Some properties of Alcohol inks
  • Translucent
  • Fast drying
  • Permanent
  • Concentrated – hence the use of felt and alcohol inks to maximize their potential
  • Ideal for use on nonporous surfaces

The most popular alcohol inks are the ones popularized by Tim Holtz and marketed by Ranger
What to consider buying to play with alcohol Inks
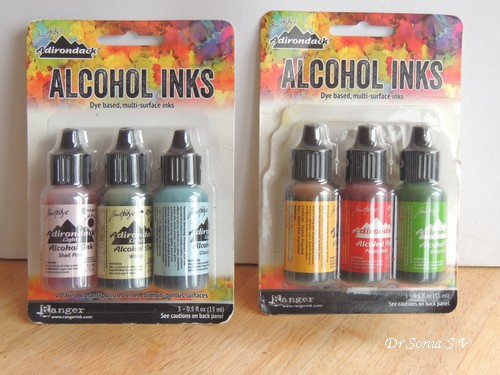
 Inks
·      Packs of 3 – for crafters starting with alcohol inks it makes sense to buy the packs which contain 3 color combinations. They are more economic and there are several color combinations you can choose

·      Individual Bottle Packs – once you get the hang of using alcohol inks you may want to play with more colors and Ranger has a huge variety of colors in individual bottle packs

·      Metal fixatives – these come in gold and silver metallic colors and are opaque unlike the proper alcohol inks. Adding them to your alcohol ink projects gives a beautiful grandeur to your projects

Felt
You can actually apply alcohol inks directly to a surface but these are very concentrated inks and using a piece of felt to apply these fast drying inks will help you get the maximum use from these inks
Also many fun techniques require alcohol inks + blending solution to be applied to the piece of felt before applying to a surface

You can buy Ranger’s Felt refill packs [the size of these felt pieces fits perfectly to the applicator tool] or cut up your own felt pieces from a felt roll you may be having. The quality of felt you use is important as if it frays a lot you will be left with lots of fibers on your project!
NOTE: felt is not the same as foam. Foam cannot be used to apply or blend alcohol inks
Applicator
An Applicator is a wooden block with a Velcro to which you can fasten pieces of felt

It’s similar to the Distress ink blending applicator you may already be having. The only difference is that instead of sponge/foam you need to attack a piece of felt for alcohol ink crafts
Why do you need an applicator?
An applicator is not absolutely essential for alcohol ink crafts! Like many crafty tools it just makes your crafting easier and more fun! Since alcohol inks stain, it’s neater and easier to use your felt pieces mounted on the applicator rather than using felt with your hands directly!
Alcohol blending solution
Alcohol inks are extremely concentrated inks and they are also super fast drying. Because of both these properties using a blending solution can help you to explore the full potential of these beautiful inks.

Alcohol blending solution can achieve 3 effects
·      Lighten Colors – if you like subtle colors adding more blending solution will help get the perfect color tone you desire
·      Blend Colors-because alcohol inks are fast drying it’s difficult to mix colors. Adding a drop or 2 of the blending solution can help achieve a beautiful blending of the colors! Will demonstrate the various fun techniques in a detailed post later.
·      Clear Colors from an area – suppose you want to remove inks completely or partially from an area a swipe with alcohol blending solution will achieve it.
Other Uses of the Blending Solution
Tim Holtz the creator of these products also says the blending solution is great to 
·      Remove glue residue from scissors etc
·      Remove ink stains
·      Use as a general clean up solution
Can you use normal alcohol instead of alcohol blending solution?
Yes you can but you need not get the perfect results you do with the Ranger’s alcohol blending solution created especially for crafting. Maybe use regular alcohol / spirit for cleaning purposes.
Working surface
Since alcohol inks are permanent inks and fast drying you need to protect your working surface from being stained with inks. 

You can either use a craft mat like the popular Ranger’s Craft sheet [ any ink stains can be cleaned with alcohol spirit swabs/ spirit or alcohol blending solution] or just cover your working area with thick plastic sheets [ which are bound to get stained]
Hand Protection

While working with alcohol inks if you use an applicator your hand staining is bound to be significantly less but still if you want to avoid ink smudges  altogether ,use a pair of gloves.
What surface can you use Alcohol Inks on?
Alcohol inks need to be applied to a nonporous surface
You won’t get the beautiful effects of alcohol inks on normal paper or cloth as they would just soak through!
Popular Surfaces for crafting with Alcohol Inks:
  • Metal
  • Aluminum foil sheets
  • Ceramic tiles
  • Glass
  • Shrink Plastic
  • Beads, pearls, rhinestones, crystals
  • Plastic
  • Acetate / transparency sheets
  • Glossy Cardstock
  • Polymer Clay
  • Some Stones
  • Resin - here are some of things I made at home with resin and alcohol Inks
Alcohol Ink + Resin 

Will be back with a detailed post on Alcohol Ink techniques

Sunday 27 September 2015

Waffle Flower-2

Hey crafty friends,

Neha here with some more waffle flower cards. The more I am using them the more I am liking them. Stamping comes out beautifully even with tiny stamps. Hope you got a chance to try out some.


I am sharing few cards made with a set called -  Love . It has beatiful flower images and some are two steps too.

For the first card, I went and stamped flowers in many different dye inks to cover my entire card front.


I added a die cut and stamped sentiment to finish it off. Did you see how crisp the images are? Beautiful...beautiful quality stamps.


For the second card, I tried pigment ink on Kraft card stock.


Check the even coverage of solid stamps on Kraft. Pretty...isn't it? I went sort of monochromatic with rest of the flowers. The sentiment is embossed in copper embossing powder.

For the next one, I stamped the frame with flower stamp on white neenah cs, and also on pattern paper. I fussy cut the oval frame from pp and ran through big shot to die cut the smaller oval with spellbinder die. I stamped the sentiment in black on it.


I cut 5 more small oval from red cs and mounted under the smaller oval to give raised, 3D effect. Finally, i colored the images with copic and stamped borders at the bottom.


Close up.

For the Next one,  I masked and stamped flowers in light memento dye inks and added shading with copics. Sentiment is by Papertrey Ink.


Next one is made with just two tiny stamps from the set. Heart and small 'XOXO' . 


I stamped hearts repeatedly with altenew ruby red ink to make the border. Stamped a border of 'xoxo' beneath it. Added a X O die cut to finish it off.


Last is a tag, stampped with same heart stamp. I added some hand drawn stem and grass border.


That is all for today ! Bye for now!


Supply :


          Memento dye Inks
          Versafine black ink


Wednesday 23 September 2015

Pictorial : Stiffy Butterfly!!


Good  Morning Everyone!!

How are you all doing, Hope fantastic :) and I am doing good too. I even hope you all might be enjoying the posts, tips and techniques shared by my fellow DT members.

In Today's post we will be talking some more about Mod Podge Fabric stiffy. It's a wonderful product and seriously great fun to work with. I am sure you all will enjoy working with the wonder bottle Mod Podge Stiffy.
In my last post I have shared basic information about stiffy ( what it is all about),now moving a step ahead with this wonder product I have yet another simple embellishment to share with you all. If you have missed my previous post about stiffy you can check it here.

Coming back, I have a fun pictorial for you all here, and I am sure you will all like it. Lets get started:

Supplies needed:-
Pearls
Fabric 
Hot Glue Gun
Butterfly image


STEP 1
 For this embellishment you will be needing some piece of Fabric( any of you choice), I have used some scrap piece of fabric here black and white in color and Mod podge Fabric stiffy .
I decided to go with Black fabric. I have taken a small piece of it.


STEP 2
Now cover the entire piece of fabric with Mod Podge Fabric Stiffy with a help of foam brush, infact you take some stiffy in a bowl and dip the fabric and lay flat on craft sheet. Now, once you have covered it completly with stiffy ( I have used multiple layers of stiffy) allow it to dry for sometime. (Couple of hours will be good)


  Once it dries, the fabric gets stiff and it dries clear, I hope you can see that in the above picture.

                                                            STEP 3
Now I have taken a butterfly image ( I have downloaded this image and printed it with an inexpensive laserjet ink printer) and fussy cut it. For cutting the piece of fabric in butterfly shape, I have pasted the butterfly (paper) with a help of masking tape and cut the fabric in the same shape. You can also use pin to hold the butterfly in place.


 I have finally managed to cut my butterfly woohhoooo. Oops I forgot to mention you will habe to cut to pieces of fabric with the same technique shared above.
(I have cut to pieces sorry forgot to share here in the image the other piece.)

 
                                                             STEP 4
Now you will be needing two piece of scrap paper and cut them in thin strips of 2 inchs size approximately and make rolls of the same I hope you can see that here in the below left image. Take you fabric lay both the pieces of fabric on top of eachother and paste it with help of glue gun. Once pasted now you have to take those rolls and pasted it right between the two pieces of fabric excatly in the middle section of the butterlfy.( Hope you can see that in the right side of the image)


Once you have pasted the two piece of fabric and paper rolls this is how the butterfly will look like. Now for butterfly antenna and thorax I have used these pearls sticks ( from my stash). I have pasted the same with help of glue gun.


Once you have pasted the pearls stcik this is how it will look like. I some how did not liked it much, so I though to add some small mulberry roses to make it thorax part.
Yay.. I love my butterfly .... what say ladies ??

STEP 5

In order to stiffen the edges or to give it more precise shape I have used hot glue on all the sides ( tip/edge of the Fabric)


And finally have decorated the butterfly with loads of pearls and even attached two pearl string at the end of its thorax. I have pasted thin strips of black paper under the top layer of fabric , this will help to give more dimensional shape to wings.


This is how my butterfly looks like, I hope you all liked. You can use this embellishment on you scrapbooks, home decor projects or use it for DIY accessories and what not.


I hope you all liked and enjoyed the tutorial. If you any questions write us in comment section below. Happy to help.

Have a nice day
Love and Hugs
Isha.

Monday 21 September 2015

Collage clay cake boxes!

Hello everyone! How are you all doing? Hope you all are enjoying the fab posts my fellow Team mates are posting :)
Well today I'm back with a new post on Collage clay!
This post was originally a video tutorial but sadly I haven't been able to upload the video due to some technical glitch soo I decided to turn it into a pictorial please ignore the not soo high picture quality and bear with me :*

This is the box we will be making and here's another version of it in a small size! ISn't it cute? And looks so edible? My nephews wanted to eat it haha :p

So lets get started!
Lets see if anyone can guess how did I create the texture of the cake? Any ideas?
Welll I used sand :p You require few basic supplies for this project I've linked them all for you :)


Lets get started!

I started with a plain wooden box removing the locks so that I have a smooth surface.

I added washi tape to it so that it stays close as I work on it  and it makes a nice border for me.

I am using the 3d matte gel by Prima for this you can also use mod podge, decoupage glue for the same 

Start by adding an even layer of the matte gel all over the box n sprinkling sand over it. Tap off the extra

The more grainy the sand the better would be the texture

Next coat it again with the matte gel sealing all the sand together n let it dry.


Remove the tape once its dry n begin painting

Im using a chocolate coloured acrylic paint for the box.

Next comes in the fun technique of making coloured clay Just pour some clay in a bowl add your fav colour of acrylic paint n mix well.


Next take a piping bag and add the clay to it. You can use any nozzle with it n then just begin piping :)


I've used 3 colours of clay for this box you can decorate it however you wish! Hope you all enjoyed the tutorial!
Have a great day
Hugs
Anchal Sapra

PRODUCTS USED