Followers

Tuesday 30 December 2014

Tilda themed Book box

Hi friends ,
Year 2014 has been an amazing & super creative for me with all    the wonderful design team members at Crafter's Corner as we learnt & had so much fun together. Love you all!
I would like to thank Shalini for this amazing opportunity. She is indeed our Craft Fairy, making our crafty wishes come true. Crafters Corner has not only helped me become a better crafter but also introduced me to all you lovely people who follow our blog and motivate us with your comments...thanks a tonn guys!!!!

This is my last post for 2014 and it had to be my favorite Tilda 😉

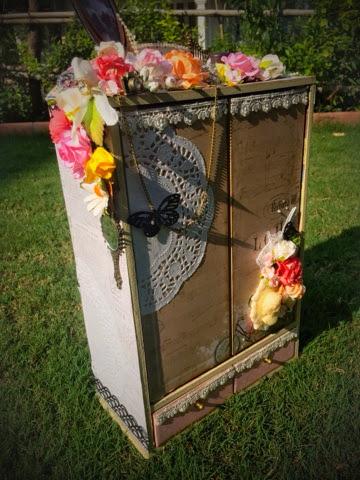
I had a book box which needed some makeover and who else than Tilda can help me jazz it up!!!
It's a super simple project which can be made with items from your stash.
So let's begin ...

I painted the box with gesso and allowed it to dry completely.


With the help of tacky tape I sticked thin strips of glitter paper to give it a finished look.
Selected few patterned paper from the gorgeous The dear Jane Stack.
Distressed the edges with vintage photo.

I adhered the paper pieces with the help of this giant tacky tape (24mm) which made the project super duper strong .


Now begins the decoration .....the part I enjoy most ...
The pictures will say it all and I will do the explanations where ever needed.


The frame is cut with Silhouette Cameo and coated it with two layers of clear embossing powder.


That's all from my end friends ...
I hope u liked this post and will give it a try.
Wish u all a very happy and prosperous new year and may all your crafty dreams come true !!!

lots of love.....
Arjita 


List of supplies:

glitter paper
Copic Markers
mini flowers
ribbon(from stash)


Wednesday 24 December 2014

Fabric Sospeso Transparente Tutorial

Altered Bottle
Hi friends I have been singing praises of Sospeso Transparente ever since I got my hands on it.
If you are new to Sospeso Transparente please read my introduction to Sospeso Transparente first : Sospeso Transparente tutorial .The printed films are my favorite for the sheer ease of working with them but for beauty I think nothing can surpass the original Fabric tape designs of Sospeso Transparente !
Fabric Flowers
Its sheer magic to be able to shape a piece of fabric into 3 Dimensional flowers!
Altered Bottle
I altered the bottle above by sponging with white acrylic paint, adding some Spellbinders die cuts and sticking on the Fabric flowers
Altered Bottle
Here is how to make Fabric flowers
Materials
  1. Fabric Tape - there are beautiful designs of these thick cotton cloth ribbon tapes at Crafters Corner
  2. Glue - special Sospeso Transparente glue - use undiluted
  3. Plastic films - special Sospeso Transparente one
  4. Embossing Pad and Embossing Tools
  5. Decoupage Spatula - awesome tool to remove those wrinkles and bubbles in all decoupage crafts not only Sospeso.
  6. Candle - good quality, non smoky variety
  7. Good scissors-Very essential and I recommend my favorite Tim Holtz Tonic Non stick scissors
Materials
There are some beautiful designs of flowers and leaves in fabric and if you are wondering can you use any cloth-- well the cloth needs to be such that it can withstand heating and not fray when you cut the designs.
Fabric tape
I used a single roll of the Gigli Rosa fabric tape to make the flowers in both my projects and still have a couple left over; so yes even though its more expensive than paper veils and printed films ,its value for money and the delicacy and the beauty of the Fabric flowers surpasses the rest
Cut design
Monica Allegro's book [ you can pick up a copy here : Sospeso Transparente book] recommends applying a thin coating of Sospeso Transparente glue on the fabric tape reverse and allowing to dry before cutting the tape to avoid fraying.But I found that when I used my serrated Tim Holtz scissors[ this baby can cut sticky foam tape too without sticking and if you use double foam tape as much as I do this scissors is a must have!] to cut out the fabric flowers , there was absolutely no fraying and you can skip that step!
Arrange on transparent plastic film
Once you cut out your designs [ why cut- to save space on your transparent film and glue!]you are ready to stick them on the transparent plastic film. I like to roughly arrange them and click a picture to refer back to so that when I am gluing I don't have to play jigsaw puzzle to fit all my designs!
Add glue to Stick
Use glue undiluted for fabric [for paper veils you have to dilute: Check Paper veil tutorial ].You can apply glue to the transparent sheet and stick your flower design or you can apply glue to the reverse of your flower design and stick to the transparent plastic.
Glue on fabric
In many ways fabric is easier than paper veils as its so sturdy and doesn't tear or wrinkle much.When you stick on the fabric  you can blot excess glue with a towel or sponge.
Blot with cloth
Get a firm wrinkle free adhesion by running a decoupage spatula over your flowers - the excess glue seeps out and you can blot this away.

Decoupage spatula
Allow enough time for the glued designs to dry. Takes a couple of hours depending on climate conditions.
Dried design
The rest of the steps are the same as in Printed films and Paper veils- cut the design and cut along the petals to the center to allow you to shape your flower when you heat and emboss.
Cut design
I found the Tim Holtz scissors invaluable in cutting the flower designs as you have to cut through a really thick layer of fabric and plastic and you  need a nice thin tipped scissors to reach all the corners too. If you dont have a good scissors you will be frustrated!
Embossing tools and Pad
Heat and emboss the flowers heating the plastic under-surface of the flowers following the Printed films tutorial and Paper veil tutorial. The only difference is that you need to heat a bit longer than you would for the printed films and you need to emboss using more force.
Magnetic Floating photo cube
I had lots of fabric flowers remaining so added them to a floating photoframe I picked up from a local shop. Shalini has brought some beautiful new products to add your Sospeso Transparente flower designs to including:
Necklaces and Chains to make jewelry
and Plastic - metal Brooches [the brooches are super economic too!]
Photoframe
You can even add the fabric flowers to curtain holders and cushions!
Fabric flowers
I didnt get time to add my family photos but you can see the photo-cube twirling

Rotating Photoframe
And here is the cube removed from the frame [ it snaps on via a magnet!]
Photoframe
I hope you enjoyed my Fabric flowers tutorial and altered projects
Fabric Flowers
Do drop a few lines how it has tuned out.
Craft Supplies
Decoupage spatula, brushes
Flower center options : Pollens and fillers
Sospeso Transparente Materials

Sospeso Transparente tutorial links
More Sospeso Transparente on Pinterest: Sospeso Transparente Pinterest

Tuesday 23 December 2014

Micro Mini in a Box!!

Hello Everyone

Its almost Christmas my favorite time of the year an old year wraps up and a new one unfolds, Eating and partying and gift giving time of the year!! 
So, keeping all the fun in mind I wanted to create a really cool little itty bitty project and mind you when I say little I mean little Lol!!


Watch the video of the complete project


Box


I painted the box black using the Distress Paint in Black Soot. And I used some papers to decorate the inside. I also used a lot of charms to embellish the inside and outside.


Micro Mini

I sued cardstock to created a little book and added some images from pattern papers listed below!! I jut love how it turned out! I have stitched the pages and used cardstock to create the covers! I have kept the miniature journal true ittself I mean as realistic as possible!!

A Micro Mini is any little mini album that is smaller than 4"x4" . So, this little guy is only 2"x1".


Watch the Other videos
To learn to create the Cabochon Closure


Materials Used

Thanks for Visiting.
Don't Forget to Subscribe!!

Ciao

Friday 19 December 2014

Kaisercraft wardrobe !!!

Hi friends ,
I was so excited when I saw the huge collection of MDF products in our store because I always enjoy altering them and love the way they jazz up my craft room or my daughters room.Kaisercraft is my all time favourite company in this regard as they make really cute innovative MDF products which are easy to assemble and are really sturdy. The thickness of the MDF sheet is also perfect.
I picked up few caddies ,storage systems and a wardrobe from the store and today I will showcase the altered wordrobe. I was thrilled  when I saw it because it was really really HUGE!!!! I had to control myself as I crazily kept adding flowers and other embellishments because the more I did the prettier it looked( I am addicted to flowers these days ...lol)

The wardrobe was wrapped tightly in a cling foil and it looked like this initially .

I sticked it with Fevicol ( because it is best suited for wood)

I  selected a gorgeous patterned paper by prima and trimmed it of the size of the panels. Distressed the edges with vintage photo ink ( I have certified it as my most favourite ink in the world.... Love u Tim Holtz for making this beautiful shade of brown)

Now let the magic begin !!!!! 
Decorating such a big 3D product can be a bit challenging at times. I wanted it to be functional so it was important that the front panels/doors open and close properly. I embellished one of the corners and rest of the deco was on top and sides.
Close up of the bouquet…..I used mulberry flowers, leaves,resin Cameo and few mini flowers.
I wanted to keep it light on the other door and so punched a Martha Stewart butterfly in black and glittered it with MS black glitter.

Did a similar but dense cluster of mulberry roses on the top and added few blings and charms .

Look at the beautiful resin rose which looks so gorgeous ...
The mirror charm on the side is so stylish and chic. The store is again full of Martha Stewart punches and I used one of them here.
The highlight on the top of the box was this frame with the vintage couple picture from the special effect sheets . I distressed it a bit and then coated it heavily with crackle accents. It also has a miniature rusted kettle which is so cute:)
Close up pics 

I added a pocket inside the door and noted down the products I have stores inside.
It is a perfect cabinet to store all the mini bottles and they look so neat and stylish.
Hope u have enjoyed the post. Give these MDF projects a try and I am sure you will fall in love with them.
Wish you all a happy and prosperous Diwali and see ya soon ...
Stay blessed !!!
Lots of love 
Arjita